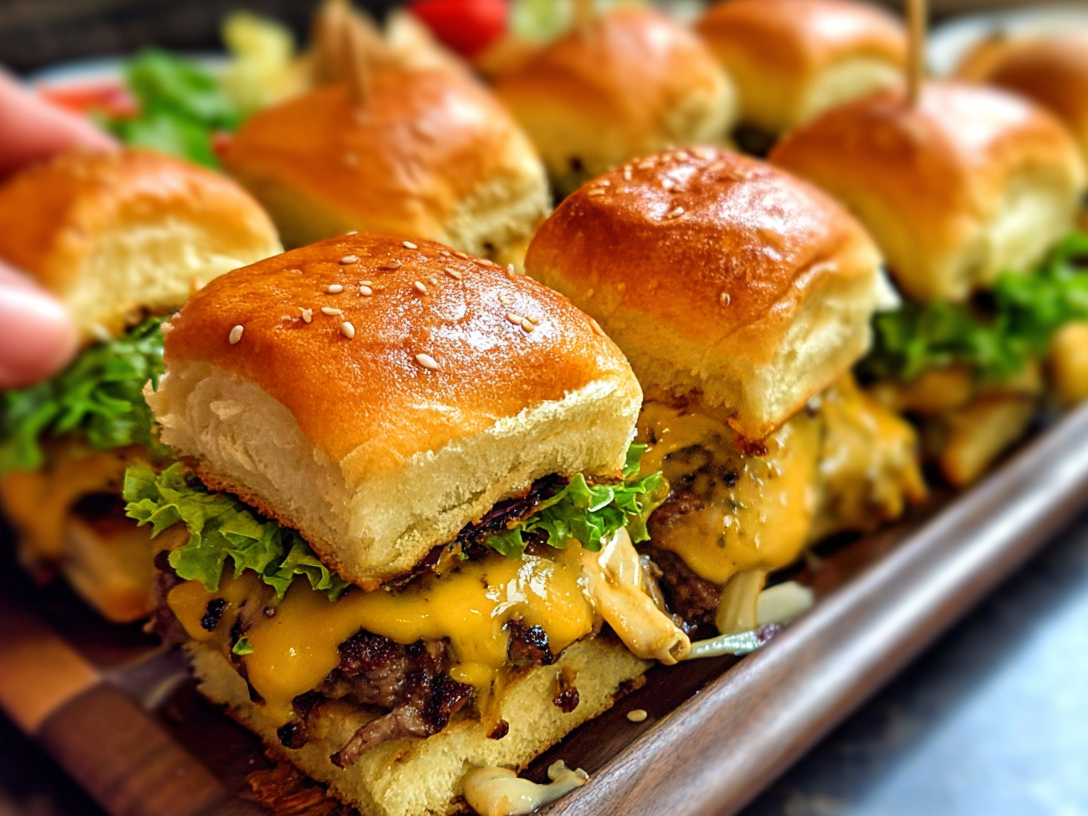
Nothing beats the flavor and fun of Sheet Pan Burger Sliders — bite-sized burgers that are perfect for family dinners, parties, or quick weeknight meals. This recipe brings together juicy ground beef, melted cheese, and soft slider buns all baked to perfection on one tray. If you’re looking for mini burgers or cheeseburger sliders oven baked, this is your go-to dish for flavor and simplicity!
Why Make Sheet Pan Burger Sliders
Making cheeseburger sliders in the oven is one of the easiest ways to feed a crowd without standing over a grill. These mini sliders cook evenly, stay juicy, and are topped with gooey cheese and your favorite burger toppings. Whether it’s a family gathering, game night, or quick dinner, these hamburger meals save you time and cleanup. Plus, the result? Pure comfort food that everyone will devour.
How to Make Sheet Pan Burger Sliders
All you need is one pan, some ground beef, cheese, and slider buns — that’s it! The beef cooks as one large patty on the pan, making this recipe faster than cooking individual burgers. Once baked, simply add cheese, cut into squares, and assemble your sliders with toppings. This cheeseburger sliders oven baked recipe guarantees juicy meat and melted perfection every time.
Ingredients
- 2 pounds ground beef (80/20 blend for juiciness)
- 1 teaspoon garlic powder
- 1 teaspoon onion powder
- Salt and pepper, to taste
- 1 tablespoon Worcestershire sauce
- 12 slider buns or Hawaiian rolls
- 6–8 slices of cheddar or American cheese
- ½ cup finely diced onions (optional)
- 1 tablespoon melted butter
- 1 teaspoon sesame seeds (optional for topping)
Topping ideas: pickles, ketchup, mustard, lettuce, tomato.
Directions
- Preheat the oven to 375°F (190°C).
- Prepare the beef layer: Line a sheet pan with parchment paper. Spread ground beef evenly to fit the pan, pressing down to make a uniform layer about ½ inch thick.
- Season and bake: Sprinkle garlic powder, onion powder, salt, pepper, and Worcestershire sauce over the beef. Bake for 15 minutes or until cooked through.
- Drain grease: Carefully remove the sheet pan and drain any excess fat.
- Add cheese: Lay cheese slices evenly over the cooked beef. Return to oven for 2–3 minutes until melted.
- Assemble sliders: Place the bottom half of slider buns on a clean sheet pan. Add the beef-and-cheese layer on top, then cover with the top buns.
- Brush and toast: Brush melted butter over the buns, sprinkle sesame seeds, and bake for 5 minutes until golden brown.
- Slice and serve: Cut into squares and serve hot!
How to Serve
Serve your Sheet Pan Burger Sliders warm straight from the oven! They pair perfectly with fries, onion rings, or a crisp salad. For parties, line them up on a tray with dipping sauces — ketchup, mayo, or barbecue sauce. These mini burgers are perfect for picnics, potlucks, and game day gatherings.
Tips for Perfect Sliders
- Use lean beef (80/20) for juicy, flavorful meat.
- Add diced onions or garlic for extra flavor.
- For a twist, swap beef for ground turkey or chicken.
- Toast the buns for 2 minutes before adding the beef to prevent sogginess.
- Store leftovers in the fridge for up to 3 days and reheat in the oven to keep crisp.
FAQs
Q: Can I make these ahead of time?
Yes! Assemble the sliders and refrigerate before baking. Pop them in the oven when ready to serve.
Q: Can I use different cheese?
Absolutely! Try mozzarella, pepper jack, or Swiss for variety.
Q: Can I freeze Sheet Pan Burger Sliders?
Yes, freeze after baking. Reheat in the oven at 350°F for 10–12 minutes.
Final Thoughts
These Sheet Pan Burger Sliders are everything you love about burgers — juicy, cheesy, and satisfying — made easier than ever. Whether for a quick dinner or a fun party platter, this recipe transforms classic cheeseburger sliders into an easy, crowd-pleasing dish. So next time you crave comfort food, skip the grill and make these delicious oven-baked mini sliders that everyone will love.
Sheet Pan Burger Sliders
Method
- 2 pounds ground beef (80/20)
- 1 teaspoon garlic powder
- 1 teaspoon onion powder
- 1 tablespoon Worcestershire sauce
- Salt and pepper, to taste
- 12 slider buns or Hawaiian rolls
- 6–8 slices of cheddar or American cheese
- 1 tablespoon melted butter
- ½ cup diced onions (optional)
- 1 teaspoon sesame seeds (optional topping)
- Optional Toppings:
- Pickles, ketchup, mustard, lettuce, tomato,
- Preheat the oven to 375°F (190°C).
- Shape and season: Line a sheet pan with parchment paper. Press ground beef into a flat rectangle about ½ inch thick. Season with garlic powder, onion powder, salt, pepper, and Worcestershire sauce.
- Bake: Place in the oven for 15 minutes, or until the beef is fully cooked.
- Drain fat: Remove from oven and carefully drain excess grease.
- Add cheese: Layer cheese slices over the hot beef and return to the oven for 2 minutes until melted.
- Assemble sliders: Place the bottom buns on a clean sheet pan. Add the beef-and-cheese layer, then top with the remaining buns.
- Brush and bake: Brush melted butter on the tops, sprinkle with sesame seeds, and bake for 5 minutes until golden brown.
- Serve: Slice into individual sliders and enjoy!
Notes
- Use lean beef (80/20) for juicy, flavorful meat.
- Add diced onions or garlic for extra flavor.
- For a twist, swap beef for ground turkey or chicken.
- Toast the buns for 2 minutes before adding the beef to prevent sogginess.
- Store leftovers in the fridge for up to 3 days and reheat in the oven to keep crisp.